Converting your iPhone app to a universal app
How to convert an iPhone app to also support iPad has been a big scary mystery to me until recently when I actually had need to do it. Like when I first started programming in Objective-C, it felt weird. But once I got the hang of it, I realized it actually makes sense and it’s not incredibly difficult.
Here I will outline the steps I took to convert my iPhone app into a universal app. These steps do assume you’re starting from an iPhone app. Lines in italic summarize the explanation given above them. You could theoretically read only those lines and get the gist of everything.
Convert the project
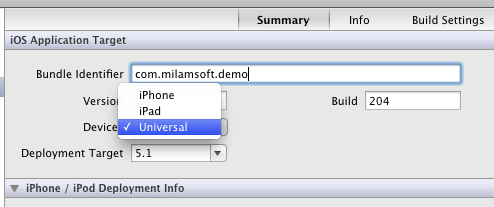
First, select the topmost item in your Project Navigator, select the project’s target in the editor window, then select the “Summary” tab.
Change the “Devices” field to “Universal”.

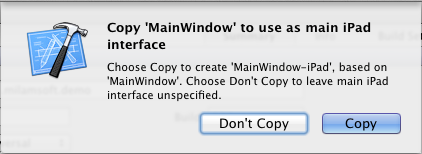
Xcode will ask whether you want to copy MainWindow to use as your main iPad interface. If your app uses something other than MainWindow, Xcode will ask about that instead.
Tell it to Copy.

Double-check that the project’s plist file got updated correctly. Open the plist file and find the line “Main nib file base name”. This one specifies the name of the xib file used when the app is first opened in the default case. There should be a new entry: “Main nib file base name (iPad)” whose value is “MainWindow-iPad”.
If the entry “Main nib file base name (iPad)” is not there, add it.

Subclassing MainWindow, AppDelegate, and RootViewController
The magic of iOS apps is when opened, they choose the xib to start based on the device family as you see from the previous step. The MainWindow xib defines the AppDelegate class and the RootViewController class, so those can (and should) be subclassed for device family as well.
Define MyProjectAppDelegate_iPad and MyProjectAppDelegate_iPhone as subclasses of MyProjectAppDelegate and leave them empty for now.
Define RootViewController_iPad and RootViewController_iPhone as subclasses of RootViewController and leave them empty for now.
Leaving the subclasses empty simply means that for now, they do nothing different from the base classes.
- Just as a quick note, every time I create a device-specific subclass, I put it in a subfolder called iPad or iPhone within the same group as the base class. This isn’t required, but I recommend it for organization.
Subclassing other views
To get the project to do everything how I wanted, I subclassed almost every view controller. Each view controller now has two subclasses, one for each device family with a naming scheme like this: MyViewController_iPhone and MyViewController_iPad. Common code gets placed in the base classes and anything that’s different between the device families gets put into the subclasses.
To get things rolling, subclass the first view in your app. Mine was a login screen, so I’ll use that as an example. Change the names of the classes as appropriate for your project.
Create two subclasses of LoginView: LoginView_iPad and LoginView_iPhone. Leave them blank so they do nothing differently… yet.
Rename LoginView.xib to LoginView_iPhone.xib. Change its File’s Owner to LoginView_iPhone.
Create LoginView_iPad.xib, set its File’s Owner to LoginView_iPad, and setup its views and connections appropriately.
Now that you have your first subclassed view, your can set up your RootViewControllers to call the appropriate view based on the device family.
In RootViewController_iPad.m, override viewWillAppear:(BOOL)animated. The code in here should instantiate the first view controller like this: LoginView_iPad* loginView = [[LoginView_iPad alloc] initWithNibName:@"LoginView_iPad" bundle:nil]; Use that view on the navigation controller.
Subclass the App Delegate and Main Window
From here, the first step is to subclass your AppDelegate. Make one for iPhone and one for iPad (MyProjectAppDelegate_iPhone and MyProjectAppDelegate_iPad). Most of the code should remain in the common MyProjectAppDelegate.m, but anything specific to the different devices should be moved into the subclasses.
Subclass your AppDelegate for each of the device types.
I recommend subclassing MainWindow into an iPhone-specific version also - MainWindow_iPhone.
Open each MainWindow_(iPhone|iPad).xib and edit the app delegate so that each points to the appropriate subclass.
Edit MainWindow_*.xib to point to the corresponding app delegate.
Subclass all controllers (if necessary)
For each of your controllers and corresponding xib files (at least those that will differ between devices), do the same process of subclassing and creating device-specific xibs. In some cases, you may need only to edit your xibs to resize and reposition controls such that the UI looks right no matter which device it’s on. Adjust Autosizing in the Size Inspector to do this.
Subclass each controller and create device-specific xibs where necessary.
While you’re editing your subclassed controllers, watch for any place another controller is initialized via initWithNibName and move those calls into the device subclassed controllers. Use the appropriate subclasses and nib names in each case.
And you’re done!
If this was all done right, much of your codebase is shared between iPhone and iPad versions of the app, all in one project. Any differences are in subclasses. Each time a view is created that will be different between devices, that call is made in the subclasses.
And, of course, this is not the definitive way to do it. This is what has worked for me, and it worked well. Good luck!